Rabbit
 |
| The Rabbit engine layout |
The
Terrapin project was so slow and bulky it would
not run. I hope the single engine
Rabbit project runs a little faster. I
may add a second engine and call it
Jackrabbit,
Lepus californicus.
Click images for bigger views.
 |
| Piston and Cylinder |
The piston cylinder is made from a 12 inch piece of ABS 4”
drain pipe. I picked a pipe that was fairly smooth on the inside. I glued a ½”
PVC barbed fitting into the 4” cap and pushed a 5” piece of 13/32” brass tubing
though holes drilled in the cap’s sides. The cylinder will pivot about this
point on a 3/8’ steel axel as the connecting rod moves on the crank.
 |
| Piston Seal |
The piston head is made from three Plexiglas discs (turned on a
router table) and a 4” o-ring sandwiched together. The o-ring is held to the
cylinder wall by the pressure (or vacuum) inside the piston and it slides well
with the help of a slathering of petroleum jelly. The o-ring seal is the only
moving part of the project where I have to contend with air leaks. If the
finished piston leaks, then the project will be postponed until I can make a
functioning piston.
 |
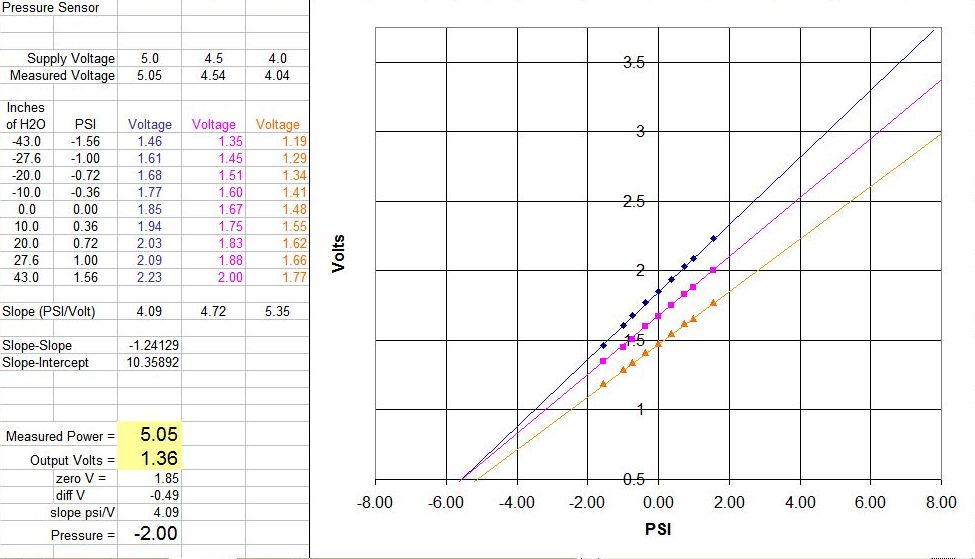
| SMPP-03 Calibration Graph |
I ordered several pressure sensors and temperature sensors
from Mouser electronics. I mounted a SMPP-03 sensor ($4.50) and a small op-amp
board ($0.49) inside a PVC fitting. At
ambient pressure, the unit outputs 1.85 V. The voltage changes linearly from
0.5V to 3.75V over the entire
+7 PSI range. I am working on PVC
overpressure and underpressure relief valves. I have $5 worth of 5/8” rubber
balls, coming from Smallparts.com.
 |
| PVC Parts |
 |
| Ardunio Uno R3 |
I ordered an Ardunio Uno R3 micro controller on eBay for
$16.49. With it, I should be able to control and monitor the engine
by way of a USB cable to an old desktop XP computer. I will be attempting to
write a VB6 interface program to send engine commands and collect data. I have
a steep learning curve ahead, but I have wanted to learn about this supposedly
excellent product for a long time, and this project is a good fit for this
device. Even if the engine does not run, I will have learned something new.


No comments:
Post a Comment